Plantronics Voyager 5200 User Manual: A Comprehensive Guide
This comprehensive guide details setup, operation, troubleshooting, and safety for the Poly Voyager 5200 headset,
covering pairing, calls, software, and finding lost devices.
Welcome to the world of clear communication with the Plantronics Voyager 5200! This Bluetooth headset is engineered for professionals needing reliable call quality in busy environments. It seamlessly blends all-day comfort with advanced features, making it ideal for both office and remote work.
The Voyager 5200 isn’t just a headset; it’s a complete communication system. It offers connectivity to both desk phones and mobile devices, ensuring you stay connected wherever you are. This user manual will guide you through every aspect of your headset, from initial setup and pairing to utilizing advanced features like voice assistant integration and Tile integration for locating a misplaced headset.
Whether you’re a frequent traveler, a call center professional, or simply need a dependable headset for daily use, the Voyager 5200 is designed to enhance your productivity and communication experience. Let’s begin exploring its capabilities!
Key Features and Benefits
The Plantronics Voyager 5200 boasts a rich feature set designed for optimal performance. Key benefits include exceptional audio quality, enhanced by noise-canceling technology for clear calls in noisy surroundings. Enjoy all-day comfort with its ergonomic design, allowing for extended wear without fatigue.
Seamless connectivity is a cornerstone, supporting both Bluetooth pairing with mobile devices and connection to desk phones via a compatible adapter (sold separately for some models). The integrated Tile finding technology is invaluable for locating a lost headset, providing peace of mind.
Furthermore, the Voyager 5200 offers intuitive controls for volume, muting, and call management, alongside voice assistant integration for hands-free operation. Multi-device connectivity allows switching between calls on your phone and computer effortlessly, maximizing productivity. Experience reliable communication and convenience with this powerful headset.
Setting Up Your Voyager 5200
Proper setup ensures optimal performance. This section guides you through unboxing, charging, and pairing with both mobile devices and desk phones for seamless use.
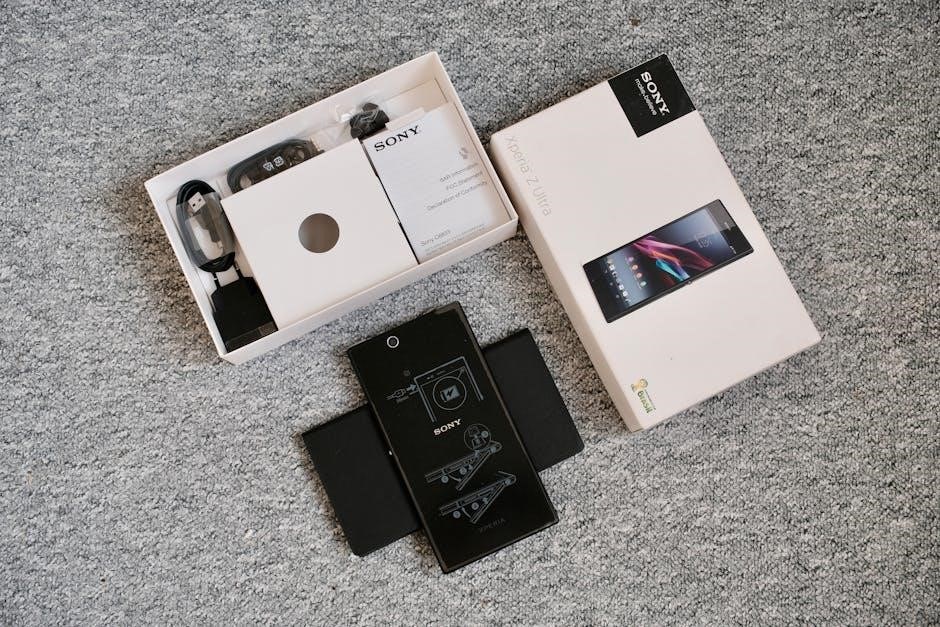
Unboxing and Component Overview
Upon opening the box, carefully verify all components are present. You should find the Voyager 5200 headset itself, a charging cable (typically USB-A to Micro-USB, though USB-C variations exist), and potentially a desk stand or carrying case depending on the specific bundle purchased. Some models, like the Voyager 5200 UC, include a Bluetooth adapter for enhanced connectivity with computers.
Inspect the headset for any visible damage. The headset features a boom microphone, volume and call control buttons, and a power/pairing switch. The base station, if included, will have connection ports for a telephone and potentially a computer. Refer to the quick start guide included in the box for a visual diagram identifying each component and its function. Ensure you have all necessary parts before proceeding with charging and pairing.
Keep the original packaging for potential warranty claims or returns.
Charging the Headset
Before first use, fully charge your Plantronics Voyager 5200. Connect the provided USB cable to the headset’s charging port and a powered USB source – a computer USB port or a USB wall adapter are suitable. A full charge typically takes approximately 1.5 to 2 hours.
During charging, the LED indicator on the headset will illuminate, often displaying a pulsing amber or red color. Once fully charged, the LED will typically change to a solid green or blue color. The quick start guide details the specific LED behavior for your model.
You can continue to use the headset while it’s charging, though this may slightly extend the total charging time. Avoid using the headset during prolonged charging periods to maximize battery lifespan. Regularly charging the headset, even when not in use, helps maintain optimal battery health.
Pairing with Mobile Devices
To pair your Plantronics Voyager 5200 with a mobile device, ensure the headset is powered off. Then, slide the power switch to the ‘on’ position. The headset will automatically enter pairing mode, indicated by flashing red and blue LEDs.
On your smartphone or tablet, navigate to the Bluetooth settings menu. Ensure Bluetooth is enabled and the device is discoverable. The Voyager 5200 should appear in the list of available devices. Select it to initiate the pairing process.
You may be prompted to enter a pairing code (typically ‘0000’ if required). Once successfully paired, the LED indicator on the headset will change to a solid blue color, and your device will confirm the connection. You can now use the headset for calls and audio.
Pairing with Desk Phones
The Plantronics Voyager 5200 connects to desk phones using the included BT600 Bluetooth USB adapter. First, plug the adapter into a USB port on your computer, ensuring it’s properly recognized. Then, connect the adapter to your desk phone’s USB port, if available, or use a USB power supply.
Put the headset into pairing mode by powering it on – the LEDs will flash red and blue. On the BT600 adapter, press and hold the call control button until the LED flashes red, indicating pairing mode. The headset and adapter should automatically connect.
Once paired, the adapter’s LED will turn solid blue. You can now answer and end calls directly from the headset. Refer to your desk phone’s manual for specific compatibility and setup instructions.

Using Your Voyager 5200
Effectively utilize call controls, volume adjustments, voice assistant features, and mute/unmute functions for optimal communication with your Plantronics Voyager 5200 headset.
Making and Taking Calls
To initiate a call with your Plantronics Voyager 5200, utilize your paired mobile device or desk phone’s standard dialing procedure. The headset automatically answers calls when placed on your head, leveraging its smart sensor technology. Alternatively, you can manually answer an incoming call by pressing the multi-function button on the earcup.
Ending a call is equally straightforward; simply press the multi-function button once more. During a call, you can seamlessly switch between your mobile device and desk phone if both are paired, offering flexible communication options. The Voyager 5200 supports voice commands for call control, allowing hands-free operation. Ensure your device supports these features for optimal functionality. For desk phone calls, the headset connects via a compatible base station, providing clear audio quality.
Remember to check compatibility with your specific phone system for best results.
Adjusting Volume and Microphone
Volume control on the Plantronics Voyager 5200 is intuitive. Use the volume up and down buttons located on the earcup to adjust the audio level to your preference. These buttons control the volume for both call audio and media playback. The headset remembers your last volume setting for future use.
Microphone adjustment is crucial for clear communication. The Voyager 5200 features a noise-canceling microphone that automatically adjusts to minimize background noise. However, you can fine-tune the microphone sensitivity through the Plantronics Hub software on your computer. This allows you to optimize voice clarity in various environments.
Ensure the microphone boom is positioned correctly – approximately one finger-width away from your mouth – for optimal performance. Proper microphone placement significantly enhances call quality and reduces the need for callers to strain to hear you.
Voice Assistant Integration
The Plantronics Voyager 5200 seamlessly integrates with popular voice assistants like Siri, Google Assistant, and Alexa, offering hands-free control. To activate your preferred assistant, simply press and hold the multi-function button on the headset; The specific activation process may vary slightly depending on your mobile device’s operating system.
Once activated, you can issue voice commands to make calls, send messages, play music, get directions, and more, all without touching your phone. This feature enhances convenience and safety, especially while driving or multitasking. Ensure your voice assistant is properly configured on your mobile device before using it with the headset.
Explore the full range of voice command capabilities for your chosen assistant to maximize the benefits of this integration. Regular updates to both the headset firmware and voice assistant software will ensure optimal compatibility and performance.
Muting and Unmuting Calls
During a call, the Plantronics Voyager 5200 allows for quick and easy muting and unmuting of your microphone. This feature is crucial for maintaining privacy or minimizing background noise during conversations. To mute a call, simply flip the microphone boom upwards. You will hear an audible tone confirming the mute status.
To unmute, flip the microphone boom back down to its original position. Again, an audible tone will indicate that your microphone is now active and transmitting audio. The headset also provides visual cues, often through an LED indicator, to show whether the microphone is muted or unmuted.
Additionally, some models may offer a dedicated mute button on the headset itself. Familiarize yourself with the specific controls on your Voyager 5200 to ensure seamless call management and clear communication.
Advanced Features
Explore enhanced functionality with Plantronics Hub, Tile integration for locating lost headsets, firmware updates, and seamless multi-device connectivity for optimal usage.
Plantronics Hub Software Installation
To unlock the full potential of your Plantronics Voyager 5200, installing the Plantronics Hub software is highly recommended. This software, available for both Windows and macOS, provides access to advanced features, firmware updates, and customization options.
Download the software from the Poly (Plantronics) website and follow the on-screen instructions for installation. During the process, you may be prompted to register for a Poly account. Once installed, launch the Plantronics Hub.
The software will automatically detect your Voyager 5200 headset. Within the Hub, you can manage device settings, configure audio profiles, enable voice assistant integration, and activate Tile integration for locating a misplaced headset. Regularly check for firmware updates through the Plantronics Hub to ensure optimal performance and access to the latest features.
Furthermore, the Plantronics Hub allows you to manage third-party application settings, enhancing compatibility and functionality with your preferred communication tools.
Tile Integration for Finding Lost Headsets
Misplaced your Voyager 5200? The integrated Tile functionality offers a convenient solution for locating your headset. To activate Tile, ensure you have both the Plantronics Hub software installed and a Tile account. Within the Plantronics Hub, navigate to the settings for your Voyager 5200.
Locate the “Tile” option, typically found under third-party applications or device settings, and activate the integration. This links your headset to your Tile network. If you lose your headset, use the Tile app on your smartphone to locate it.
The Tile app will display the headset’s last known location on a map. You can also activate a ring on the headset through the app, helping you pinpoint its whereabouts if it’s nearby. This feature requires the headset to be within Bluetooth range of your smartphone or another Tile-enabled device on the network.
Remember to keep the Plantronics Hub updated for optimal Tile performance.
Firmware Updates
Maintaining up-to-date firmware is crucial for optimal performance and access to the latest features on your Plantronics Voyager 5200. Firmware updates address bug fixes, improve audio quality, and enhance compatibility with devices. The Plantronics Hub software is the primary method for updating your headset’s firmware.
Connect your Voyager 5200 to your computer via USB or Bluetooth through the Plantronics Hub. The software will automatically check for available updates. If an update is found, follow the on-screen prompts to begin the installation process. Do not disconnect the headset during the update, as this could cause damage.
The update process typically takes several minutes. Once completed, the Plantronics Hub will notify you, and your headset will restart. Regularly checking for firmware updates ensures you’re benefiting from the latest improvements and a stable user experience.
Multi-Device Connectivity
The Plantronics Voyager 5200 excels in seamless multi-device connectivity, allowing you to effortlessly switch between your mobile phone and desk phone. This feature enhances productivity by enabling you to manage calls from different devices with a single headset.
To connect to multiple devices, initially pair the headset with your mobile phone via Bluetooth, following the standard pairing procedure. Subsequently, pair it with your desk phone using the appropriate Bluetooth adapter (sold separately for some models, like the Voyager 5200 UC).
Switching between devices is typically automatic when you answer a call on either phone. You can also manually switch by briefly pressing the call control button on the headset. The Plantronics Hub software provides options to manage and prioritize connected devices for a customized experience.
Troubleshooting
This section provides solutions for common issues, headset resets, LED indicator explanations, and audio problem resolutions for the Plantronics Voyager 5200.
Common Issues and Solutions
Headset won’t power on: Ensure the headset is adequately charged. Connect to a power source and allow sufficient charging time. If still unresponsive, attempt a reset.
Pairing difficulties: Verify Bluetooth is enabled on your device. Ensure the headset is in pairing mode (flashing red and blue lights). Remove previous pairings from your device and retry the pairing process. Keep the headset close to the device during pairing.
Audio distortion: Check the volume levels on both the headset and the connected device. Ensure the microphone isn’t obstructed. Try disconnecting and reconnecting the headset. Update the Plantronics Hub software for potential firmware improvements.
Call quality issues: Confirm a stable Bluetooth connection. Reduce distance between the headset and the connected device. Minimize interference from other electronic devices. Ensure the microphone boom is positioned correctly.
Tile integration problems: Confirm Tile app is installed and updated. Ensure Bluetooth is enabled. Activate Tile within the Plantronics Hub application.
Resetting the Headset
To perform a factory reset on your Plantronics Voyager 5200, press and hold the Call button and the Volume Up button simultaneously for approximately 10 seconds. The headset will announce “Resetting” and the LED will flash. This clears all paired devices and returns the headset to its original factory settings.
A soft reset can be achieved by briefly pressing the power button off and then immediately back on. This doesn’t erase pairings but can resolve minor software glitches. This is useful for temporary issues like frozen screens or unresponsive buttons.
If the reset process fails, try charging the headset fully and repeating the steps.
LED Indicator Meanings
The Voyager 5200 utilizes LED indicators to communicate headset status. A flashing red and blue light signifies pairing mode, indicating the headset is discoverable by devices. A solid blue LED confirms a successful Bluetooth connection. Flashing blue suggests the headset is connected but not actively in a call.
A solid red light during a call indicates the microphone is muted. Flashing red while not on a call signals a low battery; charge the headset promptly. A white flashing light during charging indicates the headset is actively charging.
A solid white light signifies a full charge. Purple flashing indicates the headset is in USB audio mode. Understanding these LED signals helps diagnose connection and power status quickly. Refer to the full user manual for detailed explanations of all indicator states.
Audio Problems Troubleshooting
Experiencing audio issues? First, ensure the Voyager 5200 is fully charged and properly paired with your device. Verify the volume is adequately adjusted on both the headset and the connected device. If audio is distorted or faint, try unpairing and re-pairing the headset.
For muffled audio, check the microphone for obstructions. If no audio is heard, confirm the correct audio output device is selected in your device’s settings. Restarting both the headset and the connected device often resolves temporary glitches.
Consider updating the Plantronics Hub software for potential driver updates. If problems persist, a factory reset (refer to the ‘Resetting the Headset’ section) may be necessary. Consult the online support resources for further assistance and specific troubleshooting steps.
Safety and Warranty Information
Prioritize safe usage by following provided instructions. Review warranty details for coverage, limitations, and claim procedures regarding your Plantronics Voyager 5200.
Important Safety Instructions
To ensure safe operation of your Plantronics Voyager 5200, heed these crucial guidelines. Avoid using the headset during hazardous activities where situational awareness is critical, such as operating vehicles or machinery. Prolonged exposure to high volumes may cause hearing damage; maintain moderate listening levels.
Do not disassemble or attempt to repair the headset yourself, as this will void the warranty and could pose a safety risk. Keep the device away from extreme temperatures, humidity, and direct sunlight. Clean the headset regularly with a soft, dry cloth. Avoid using abrasive cleaners or solvents.
Battery safety is paramount: Do not incinerate or expose the battery to high temperatures. If the battery appears damaged or swollen, discontinue use immediately. Dispose of the battery properly according to local regulations. This device complies with relevant safety standards; however, responsible usage is essential for preventing potential hazards.
Warranty Details
Poly (formerly Plantronics) offers a limited warranty for the Voyager 5200 headset, protecting against defects in materials and workmanship. The standard warranty period is one (1) year from the date of purchase, covering component parts and labor for repair or replacement at Poly’s discretion.
This warranty does not cover damage resulting from misuse, accidents, unauthorized modifications, or normal wear and tear. Proof of purchase is required for all warranty claims. To initiate a claim, contact Poly customer support through their official website or authorized service centers.
Warranty limitations apply: Poly is not liable for any incidental or consequential damages. This warranty provides specific legal rights, which may vary depending on local laws; Extended warranty options may be available for purchase, offering additional coverage beyond the standard period. Refer to the official Poly warranty statement for complete details.